This is a place where you can find the diy stuffs that mom will love and technical stuffs, specially computer programming. Working full time as a software developer, I try to update myself with the new technologies. And, being a mother of the beautiful daughter, I love to entertain my kid with new things and play with her.

Tuesday, 5 August 2014


This is the cardigan that I knitted for my 18 months daughter. I followed the tutorial from the youtube video called "EASY crochet baby cardigan tutorial". Thanks to the person who shared such a nice and easy pattern.

For this cardigan, I had to do some mathematical calculation because the original video was for a baby of 0-3 months and i was knitting for a toddler. I started with 120 chains with 4mm hook. I do not exactly remember how many rows I knitted before making the sleeve but I just measure on my daughter body, until I thought it is enough.

For the sleeve, I knitted 35 chains instead of 28 as described in the video.
The tricky part is after you add the sleeve. I did some calculation and figured out that it will be 11-14 for 120 stitches instead of 9-11.

I also added a flower in a cardigan following a tutorial from the youtube called
"How to crochet a flower"

Here is my daughter wearing a cardigan.


Thursday, 31 July 2014

While writing a SQL query, sometimes you often want to convert the rows to column. This will be hellpful when you are joining with the another table and you don't want the result to be dublicated per row.

Example:
Col_idCol_Name
1Apples
2Oranges
3Grapes
4Pineapple

SQL Query:
SELECT RTRIM(XMLAGG(XMLELEMENT(e,a.col_Name
    || '; ')).EXTRACT('//text()'),'; ') new_column
  FROM TABLE_NAME a;

Output:

New_column
Apples,Oranges,Grapes,Pineapple

Tuesday, 29 July 2014

Kids can be fussy eaters. Sometimes they just want to play with food rather than eating. Won't it be great if your kid is enjoying while eating? Adding a little food fun can make all the difference.
Here is the Peppa Pig breakfast that I made for my beautiful daughter. She loved it.

To make one of this, I will recommend drawing the picture in the paper first as a template. Cut down each piece and make Peppa Pig according to the template.
Following ingredients were used:
  1. Head: White bread
  2. Eyes: Blue berries
  3. Nose: Cheese with Nutella
  4. Mouth: Nutella and strawberry
  5. Body: Watermelon
  6. Hands and feet: Carrot
  7. Grass: Cucumber
My daughter loves carrot, she ate the  carrot tail before I  could even take the picture.

Here is my lovely daughter enjoying the breakfast.
Also, I sent this picture in the S26 Gold "That's Yummy Mummy" competition and won the weekly best prize. 


Thursday, 10 July 2014

These are the steps if you want to use SQL Server from Oracle's SQLDeveloper.

  1. Download jtds (open-source SQLServer JDBC driver) from here. Unzip and extract the jtds-1.2.jar (the latest version) to your computer.
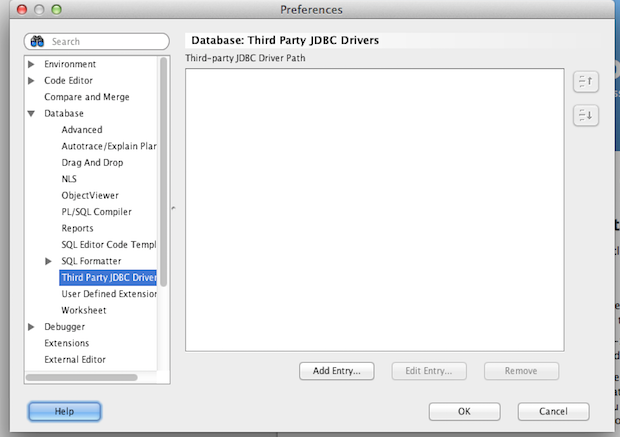
  2. Open SQLDeveloper and goto: Tools->Preferences->Database->Third Party JDBC Drivers. Click “Add Entry” and give the path where you have downloaded jtds-1.2.jar
  3.  Now goto SQLDeveloper and click the "New Connection". You will now see the extra tab for the SQL Server.
  4. Give the credentials of database to connect.


Monday, 7 July 2014

On the weekend, we bought a new TV cabinet and apparently, our old tv cabinet was useless. My husband was in favor of either throwing it away or selling it. But I had a better idea. All I could see in this old tv cabinet was a lot of storage spaces, which will be perfect for my daughter to store her toys. I though why not then convert it into a bench where she can relax and then store toys beneath.
Here is a picture of the tv cabinet
My plan was to put a wooden plank and cover it with a layer of foam and then fabric. We went to the Bunnings for buying the wooden plank. The plank that we needed was 120 cm X 40 cm. We were thinking to request  someone at Bunnings to cut into the size that we need, but we got lucky and found the exact size plank that we needed. It cost $15.
The next thing I needed was a piece of fabric. I went to Spotlight and saw this beautiful fabric which I felt in love with, and the best part was it was at half price. I bought 1.5 meter of it which cost me only $9.


My project began in the weekend. I put a layer of foam in the wooden flap.  I have got some spare foams from my old computer box which I stick together to make it appropriate size. It was in square size, but I cut it and stick together in the wooden flap. 


Then I cut down one of my old duvet to the size of the fabric. I want to put one extra layer in the foam. I have seen in many similar project, this step has been skipped but adding extra layer makes so much difference.
The next step was to cover the foam and wood with the fabric and duvet. I don't have a nail gun, so I just use a traditional method with nails and hammer. Believe me, it isn't that hard if you have a craft loving partner too. My hubby helps me with it.


My daughter was too curious to see what we were doing.
The back side of the wooden plank looks like this once you finished.
All done. The next thing I need was some baskets to put underneath. I looked in some of the places but could not find the size and color that I was looking for. Then I saw this one in the Reject shop. It was the perfect size and was $8 per basket. I bought 4 of them for $32.


Now this is how the end product looks like